Tuesday, August 23, 2011

Put a Lid on It

Why you should wear your helmet—even if you can lawfully ride without one
By Bob Mionske
No state requires adults to wear a helmet when they ride (although some municipalities do). But you could still face legal consequences if you fail to strap one on. Consider this scenario: A negligent driver hits you, and you sue him for the cost of your medical expenses. However, his insurance company claims that you were negligent for not wearing a helmet. The outcome of the case will depend on whether the jury decides it was reasonable for you to ride without one. They might not: Many people believe that helmets prevent all head injuries, although it is still possible to suffer one while wearing head protection.
However, in places where personal liberty is prized over safety, the “Where was your helmet?” argument won’t play well with the jury, so defense attorneys will decline to make that assertion. And in some areas, case law will prevent the absence of a helmet from being introduced into evidence. In Oregon, such a defense is prohibited. Still, insurers will shift blame to cyclists when they can, so in areas where such evidence is allowed, expect more arguments like these.
Nationwide, the law on helmets is evolving. Until it is settled in favor of cyclists (assuming it is), think of your helmet as an insurance policy: It might not prevent every injury, but it will protect your legal rights.
Helmets Are (Not Just) For Kids

The map above shows the age at which cyclists can legally ride helmet-free in each state. Bonehead alert: Whatever the law, helmets are a smart idea for cyclists of any age.
Research and assistance by Rick Bernardi, J.D. Thanks to attorneys Phil Coats, Jim Freeman, Megan Hottman, Ken Rosskopf, Brad Tucker, and Peter Wilborn for sharing their thoughts.

Sunday, August 7, 2011

Phoenix to Mesa thru Papago Park

Ride Stats
Courtesy of Cyclemeter 5.0 for IPhone4:
Ride Time: 1:22:05
Distance: 14.92 miles
Average: 10.89 miles/h
Fastest Speed: 20.82 miles/h

    Today, I wanted to try something other than the standard loop ride where it’s usually repeating part of the ride heading the other direction. My thought was to drive somewhere, leave my car, take a bus or train far enough away and travel back. What better way to ensure a nice ride, thank to leave my car in a place I HAVE to ride to in order to get back? Kind of a sick/dangerous training philosophy, I'm sure you will agree.
    I drove to the Mesa Park ‘n Ride and hit up the Valley Metro Light Rail. Arrived 10 minutes early as I was told to on their site, went to the vending machine to get my ticket only to realize they don't have a dollar  changer and took only coins and card. As I pull out my card, swipe for my ticket, I hear the Ding Ding....and watch my train pull off 10 minutes early... Weak!! At least Train number 2 was sitting there waiting and I was able to board and sit in the AC (it was already about 88 at 6:30am.) The ride was only about 15 minutes to Phoenix and in no time I was at 44th / Washington (also the airport entrance AND one of the stations I worked on back at TranSystems.) Swung by the old digs so I could shoot a few reflection shots prior to hitting the road.


    All geared up, I was ready to set out, and make my way back to my car about 14.5+- miles away in Mesa. Very excited, I cranked up my tunes and hit the Cyclemeter start button and was off. Instantly I noticed the humidity was much higher than usual (about 38%.) Those used to the humidity will agree that is not high, but for the desert and our "dry heat" that is not dry at all! As I was headed up 52st street towards McDowell I realized I hadn't heard anything from Cyclemeter which lets me know current speed, distance etc. [Definitely a recommended app for cycling] So I quickly pulled over to take a look. NO GPS?? WTF? Not a cloud in the sky and I can't get a GPS signal? Odd... so I rebooted the phone and GPS came back up. Off on the road again.

View of Camelback Mountain

    Next stop the top of Mcdowell Road at Papago Park, this turned out to be quite a challenge! I've driven over this countless times and never thought of it as much of a "hill" but about 3/4 the way up i could feel a serious burn in my legs! Bonus!! Felt great tho, most of the training I've been doing has been on fairly flat ground. This was quite an elevation change.

Looking Up McDowell Road

    I reached the Top! Whoop! I didn't even have to stop, simple played the gears and worked the bike all the way to the top. This was a nice achievement and looking back on downtown Phoenix really made the uphill "battle" feel worth it.


Downtown Phoenix behind me

    Of course the obvious benefit to the uphill battle is the awesome downhill coast which follows. This was sooo much fun. I flew down that hill, though only reached about 20 mph top speed, but its a fairly long slope so it was a nice relief to the burning legs.

Down towards Scottsdale
Cactus!

    Next up was Gavin Parkway which runs between McDowell and Van Buren. Its a nice slope too and goes by the Desert Botanical Gardens and the entrance to Papago Park. Its been a long time since I've hiked this park, but it was nice to ride thru it on my bike, I'd never done that before.

Papago Park


Papago Hole in the Rock


    Passed thru Papago Park and on my way into Tempe. This is a great ride because I get to ride across Tempe Town Lake which is a nice change of view when living in the middle of "dirt." Tempe  town lake also offers many different trails, Fishing, boating, Event venues and many other activities.

Welcome to Tempe


Tempe Town Lake

Mill Ave


Home of the ASU Sundevils "Go Devils!"


202 / 101 Transition

    Unfortunately, at this point, my phone/camera mount on my bike broke and my pictures of this adventure end. Phone had to go back in the bag. Fortunately, this was end of the scenic part of the adventure and there are no pictures for the final 3-4 miles but I assure you that you aren't missing out at all. It all ended well though, after about 1:20 minutes I was back at my car and ready to head home, shower and start the day.

    Today's trip was alot of fun, I'll have to plan some more trips like this in the near future as I really had a good time. I liked the one way approach to riding my bike and can't wait to  do it again. Hope you enjoyed the trip, stay tuned for future rides!

Thursday, August 4, 2011

Everything You Wanted to Know...

Sheldon Brown photo

Everything You Wanted to Know

About Shifting Your Bicycle's Gears,

But Were Afraid to Ask...

Understanding Your Gears

Multi-speed gears allow you to climb hills comfortably that might force you to stand up and "pump" or even get off and push if you were riding a one-speed. They also allow you to go faster downhill or with the wind at your back.

Cadence

Every cyclist has an ideal "cadence" (pedaling speed), and an ideal amount of resistance from the pedals. When you are pedaling at your ideal cadence, you are putting out the greatest amount of power that you are able to sustain efficiently. You select your cadence by shifting gears. The gear needed to allow your "ideal" cadence will depend on the slope of the road, the wind conditions, and your own condition at any given time.

High or Low?

"Higher" gears put more resistance on the pedals. If you select a gear that is too high for the conditions, it will force you into a slower cadence.
Pedaling slower than your ideal cadence is wasteful of energy. You also run a higher risk of muscle strains and joint damage, particularly to the knees and hips.
"Lower" gears make the pedals easy to turn, so it becomes easier to spin to a fast cadence.
Pedaling faster than your ideal cadence can allow you to generate an extra burst of speed, but you will tire yourself out too soon if you try to maintain an excessively fast cadence.

The Perfect Bicycle

If you had a perfect bicycle, with an infinite number of gears, you would always be pedaling at the same cadence, with the same amount of resistance to the pedals. Of course, the bike would go slower uphill, and faster downhill, but your legs would not know the difference.
Inexperienced cyclists often pedal at a cadence that is too slow, (too high a gear.) They sometimes think that this is better exercise, because they have to push harder on the pedals. This is an illusion.

Power lifting or swimming?

Consider two very different types of exercise: Power lifting vs. swimming. After you have lifted the 200 LB barbell half a dozen times, you go take a shower--high force, few repetitions. Swimming, on the other hand, involves very little resistance--you are only moving your hands and legs through water--but with many repetitions.

"Pushing" vs. "Spinning"

"Pushing" a high gear at a slow cadence is like power lifting. It is good for building up muscle mass and bulking up your legs, but it does little for your heart or lungs, and you can hurt yourself if you overdo it.
"Spinning" a lower gear at a rapid cadence is more like swimming. The rapid motion, with many repetitions makes the legs supple and flexible, it is highly aerobic, and the light pressure that goes with this style reduces wear and tear on the joints. With practice "spinning" becomes easier and more comfortable.

Securing your feet

Toe clips or "clipless" pedals make it easier to spin effectively. They also enhance safety, because they keep your feet from slipping off of the pedals. They take a bit of getting used to, but experienced cyclists find them invaluable.

Nuts & Bolts of Derailer Gears

On a 10-speed bike, the front of the chain runs over one of 2 "chainwheels" or front sprockets attached to the pedal cranks. The rear of the chain wraps around one of 5 sprockets attached to the hub of the rear wheel. The 2 chainwheels times 5 rear sprockets give 10 theoretically possible combinations. This set-up requires two separate gear shifting mechanisms or "derailers", one for the front 2 and the other for the rear 5. This is as complicated as bicycle gearing gets.
A 27-speed bike is just the same, except that there are 3 chainwheels in front and 9 sprockets in back. There are still just two derailers, and two control levers.
The control on the left side shifts among the 2 or 3 front chainwheels; the one on the right shifts among the 5-9 rear sprockets.
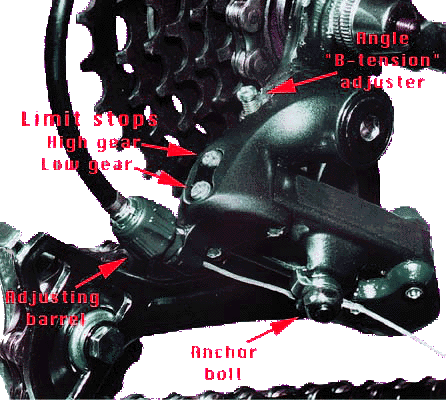
How Derailers Work

A derailer leads the chain from one sprocket to another, while the chain is moving forward. The front derailer is a simple guide that moves the chain from side to side.
derailer
The rear derailer is a bit more complicated, because it also contains the spring and pulleys that adjust the length of the chain as it moves to different-sized sprockets.

Always pedal forward

The chain can only move sideways while it is also moving forward. For this reason, you can only shift while you are pedaling forward.
The rear derailer shifts using the bottom of the chain loop, which is under light tension from the derailer's pulleys and springs.
The front derailer shifts using the upper part of the chain, the part that transmits power to the rear wheel. As a result, the front shifting will not work so well while you are pedaling very hard, or slowly, or both.
The rear derailer can usually shift under full load, but it is better for the chain to ease up a bit during the shift.

What's What

Try to visualize gear shifting in terms of where the chain is, rather than by rote memorization of positions of the shift controls.
The sprockets that are closer to the middle of the bike (small front, large rear) give the lower gears. The outer sprockets (large front, small rear) give higher gears.
Try to avoid the gears that make the chain cross over at an extreme angle. These "criss-cross" gears are bad for the chain and sprockets. Especially bad is to combine the inside (small) front sprocket with the outside (small) rear sprocket. This noisy, inefficient gear causes the chain to wear out prematurely.

I take no credit for the previous article, this was written by Sheldon Brown and
reposted from his website at  http://sheldonbrown.com/gears.html (An Excellent resource for Beginning Cyclists)

Monday, August 1, 2011

[Product Review] PowerGrip Sports Pedal

Purchased at REI
Purchase Price: $44.00 + tax
Personal Rating: 4 out of 5 stars


My intention for purchasing the Power Grip pedal kit was to start off with a 'secured' foot/pedal setup like a pedal+clip+shoe combination without the larger upfront investment to see if I like the feel of that kind of setup. After doing some research it seems that choosing this combination gets complex / expensive very quickly. The $44 dollar price tag made this choice a no-brainer, and the obvious cheaper option / worthy smaller investment.
The install was super easy and took less than 15 minutes. They come in the box full assembled so there was no setup out of the box. Simply unscrew the old pedals with a wrench and install the new Power Grip Pedals. The trickiest part is adjusting them to fit your feet. This is done with several screws on the sides of the pedal that allow you to better fit the strap to your specific shoe. I wear a size 11, Nike cross training shoe for riding my bike, and unfortunately is seems that my shoe may be a little wider than these straps are intended. The shoes do fit, don't get me wrong, but getting my feet into the straps is a little harder than I thought would be the case, fortunately they do sell an XL version of the straps which I have yet to try. The straps cross the pedal diagonally and the idea is that you insert your foot in a pigeon-toe manner, then straighten out to cinch the strap down on your shoe, giving you the additional power available with the up/down stroke of pedaling. 

Installed Angle 1

Installed Angle 2

The learning curve is fairly short, after only 2 rides, I really like the Power Grip Pedals and can easily see using them for a while and putting the Clip/shoe combo on hold for the foreseeable future. The power difference was fairly significant, using my Cyclemeter app for IPhone 4 app I was able to see that I've raised my mile per hour speed from a previous average of 11.5-12.5 up to 16.5mph at my peak on my last ride.
I'm very happy with my recent purchase, and plan to look into the XL Straps to allow me a little more foot room and ease of getting my feet in and out of the pedals. I only gave it a 4 of 5 stars because of the smaller straps, I feel that a size 11 shoe is pretty average size and would have liked to see them use a longer strap as a base configuration.
Finally, though I spent the $44.00 and feel that they were well worth it, I found that with super saver shipping you can get this same kit for a little over 5 dollars cheaper at Amazon. 

Thanks for reading my review and Happy Cycling.